Cursive handwriting is an art which is both beautiful and useful. In 2026, knowing cursive will be more important than ever, whether it is to add a few notes to yourself, a creative project, or just to add a bit of sophistication to your handwriting. Cursive writing is smooth unlike print and has the ability of flowing together to form beautiful and legible words. It is not just pleasing to the eyes, but also improves fine motor skills and thinking.
This step-by-step tutorial will give you all the information you need to know about how to do cursive; how to create simple strokes to how to write the entire sentence without any doubts. The techniques are specific to your needs: whether you are a beginner who wants to learn or someone who wants to polish his or her skills, these techniques will help you to write smooth and stylish cursive without any stress. Want to change your writing and amaze with each pen line? We should jump in the art of the cursive and discover the smoothness of handwriting in 2026!
Quick Start: Cursive Basics in 5 Minutes
It does not need to be too difficult to begin with cursive writing. With the right tools and posture, as well as grip, you can prepare yourself to success in less than five minutes. This is what you must learn to get your cursive adventures off to a good start.
Essential Tools and Materials Checklist
To ensure that your practice is enjoyable and effective, a few important tools to use are to be gathered before you start:
- Quality Paper: Find lined or a cursive practice workbook. The way your letters are guided is supported by the lines.
- Pens or Pencils: A smooth writing pen or a regular pencil should be used. Do some experimentation on the types to determine what is comfortable.
- Eraser: A good eraser is essential when you are using a pencil to erase the paper.
- Ruler: To practice straight lines, as and when necessary.
- Reference Guide: Have a sheet of cursive letters around to use as a guide as you write.
Proper Sitting Position and Paper Placement
Your posture can greatly impact on your writing. The following are some of the tips of sitting position and placement of paper:
- Sit Up Straight: Sit on a comfortable seat that will support your back. And remember not to put your feet up or your arms up.
- Paper Position: Lean the paper to the side of the dominant hand (approximately, 30-degree angle) so that the movement becomes easier. Position the paper approximately 1 inch above the table top in order to free your wrist.
Basic Grip and Posture Techniques
The grip of your pen or pencil influences the ease and comfort when writing. This is the way to develop a correct grip and stance:
- Grip: You should hold your pen with the thumb and the index finger and leave it on the middle finger. One should not hold it tight because they may become fatigued.
- Wrist Position: Have a loose and flexible wrist and make it move with your hand as you write. This facilitates the natural movement of your strokes.
- Elbow Placement: The position of your elbow must be quite comfortable on the table so that you are not straining.
Now that you have these simple tricks on tools, posture, and grip, you are all ready to start your curriculum on cursive with a lot of confidence.

Understanding Cursive Fundamentals
For those who have query in their mind how to do cursive writing should remember that cursive writing is not just a beautiful handwriting but also an ability that involves art, usefulness and intellectual growth. Learning the basics of cursive will further enhance your appreciation of this ancient mode of handwriting and will encourage you to learn it with a purpose. This section will discuss the reasons why learning cursive is still important today and provide you with the general overview of the most popular cursive writing systems.
Why Learn Cursive in the Digital Age?
Cognitive benefits and brain development
Cursive writing involves more of the brain as compared to printing or typing. It increases motor dexterity, more memory storage, neural activation, which helps with processing language and creativity. All of these advantages enhance the general growth of the brain and children are most affected.
Practical applications and personal expression
The cursive promotes individual style in addition to utility, in terms of signing, or writing notes by hand. It enables people to show personality in terms of flow and rhythm of writing, and hence communication is more meaningful.
Historical significance and cultural value
Cursive takes us back to the old days when people wrote down history, literature and life in general prior to electronic documentation. Knowledge of cursive helps one to value the culture of the ancient manuscripts, letters and even the legal documents.
Professional and artistic advantages
Neat cursive may have a professional appearance and be taken as a sign of professionalism and care especially in formal letters. Cursive has been used, both artistically and aesthetically, as an underpinning of calligraphy and artistic lettering.
Cursive Writing Systems Overview
American Cursive: Standard school style characteristics
Cursive taught in schools in America has loops, slants, and connected letters. It is focused on the readability and speed, in order to help students learn how to write. Its readability facilitates personal expression as well as day to day writing.
D'Nealian: Transition from print to cursive
The style of the D'Nealian cursive is a transitional style that is between the print and the cursive where the letters are slanted and the design is simplified to facilitate the transition. It aids in advancing cursive learning in the learners slowly, which strengthens muscle memory in fluid writing.
Palmer Method: Business writing tradition
Palmer Method is the classical cursive method with emphasis on speed and efficiency particularly in business. It focuses on making things uniform and simple, and it is mostly applied in workplaces, where one can write in a hurry, and the text is easy to read. It is still applicable in enhancing cursive in business letters.
Modern Variations: Contemporary styles and adaptations
Over the last several years, the modern cursive versions have developed which are variants of the traditional methods with a twist to make a stylish and unique handwriting. This flexibility enables cursive to change without losing its essence so that it can stay relevant in the educational and self-expression process.
Knowing such styles also allows you to pick the style that works best with your objectives and writing style as you grow and become skilled in cursive handwriting.
Step-by-Step Letter Formation Guide
Learning to write in cursive hand begins by learning to create every letter in a meticulous manner. This letter formation instruction guide is used in a step-by-step format where cursive letters are divided into small manageable groups, which helps to learn about stroke, prevent general errors, and build smooth connections. Through practice, you will develop a solid base in penmanship that will be fluent and clear.
Lowercase Letter Groups by Stroke Type
The lower case letters are divided into stroke types, undercurves, overcurves and loops, each of which has its own peculiar features in the way of writing. Classification serves to concentrate on certain simpler methods.
Undercurve Letters (a, c, d, g, o, q)
These letters begin with a simple undercurve movement and then returns to the beginning of the letter body to start the body.
- a: For those who are thinking how to do a in cursive, should remember this; make a small undercurve of the baseline towards the body and then a loop and a tail.
- c: There is one undercurve which begins at the baseline and curves upwards and down to the baseline.
- d: Start with a straight upwards curve, form an undercurve and end up with a tail.
- g: Like a, except that there is another loop that is below the baseline.
- o: This is a full circle beginning with the baseline.
- q: Begins as o but ends with a falling tail.
Common Mistakes and Corrections
- Letters should be neither too small nor too large, develop a habit of keeping them of a uniform size.
- Make sure that the undercurves are rounded and smooth, sharps removed.
Practice Words and Connecting Patterns
- Key words: "go", "dog", "cat", "fog"
- Exercise between these letters to form fluidity between the letters.
Overcurve Letters (h, k, l, b, f)
Overcurve letters begin with a high upward stroke which sweeps over and then descends.
- h: This is an overcurve of a high line which starts with a high line but ends in a downward curve along the baseline.
- k: First a high line, a diagonal line, which ties back to the bottom line.
- l: An arduous line upwards, then a slight arch in place of the baseline.
- b: This is actually the same thing as the h except there is a closed loop that returns to the baseline.
- f: Tall stroke, with a loop, which rounds back up.
Height Consistency Techniques
- Keep a clear mark and middle point to make sure that the letters are always sized.
- Visual aids (e.g. lined paper) can be used to aid height consistency.
You can experiment using flourishes and minor variations of style after becoming more familiar with the fundamentals to add some character to your writing.
Loop Letters (e, i, u, w, t, j, p)
These letters have loops that are of different size and direction.
- e: This is a tiny loop that is caused to protrude off the baseline, forming a drop down.
- i: Begin with a tiny circle, with a spot on top of it.
- u: Rounded loop back to the baseline having an articulate dip.
- w: Two rounded loops which go back to baseline.
- t: A small loop consisting of a descender.
- j: For those who are wondering how to do a j in cursive, should remember that it is a variant of 'i' except that it extends downwards below the baseline.
- p: Beginning at the bottom, form a downward and curvy form under the bottom.
Ease of emphasis on a uniform loop size and follow ascender (upwards) and descender (downwards) rules so that there is no overcrowding. Difficulties in connecting loop letters are common problems and this problem can attained through guided practice and initially slowness in movement.
Uppercase Letter Formation
The letters in the upper case demand special attention to their formation in order to be prominent and simultaneously bright. In this section, techniques of creating the basic and complex capital letters will be given.
Basic Capital Letters (A, C, E, O, U)
Begin with easy formations that are simplified and can be used in the daily writing. Emphasis should be on straight lines and clear angles to be read significantly.
- A: Two diagonal lines with a crossbar in their intersection.
- C: An extensive curve at the top to the bottom.
- E: Three strokes in a horizontal direction joined with a vertical stroke.
- O: An ideal circle that was generated by a flat base
- U: Two straight lines down having a rounded base.
They can also be customized to business cursive formats in which the main consideration is legibility and speed. In addition, in personal signature, capital letters, such as A or E, may have slight loops or slants that do not affect the readability.
Complex Capital Letters (B, F, G, P, R, S, Z)
In these letters, there are several strokes, loops and flourishes that are based on traditional cursive designs.
- B: A vertical line with two loops on the right being rounded.
- F: Take a long straight and straight upwards line with a horizontal cross-bar and a small loop on the top.
- G: Make a big oval and have a short tail which is horizontally or curled to the right.
- P: Delineate a straight line with a rounded shape on the upper right and a top.
- R: Begin as P and add a diagonal leg down to the right.
- S: This is to form a smooth flowing S-shape top and bottom curve are equal.
- Z: Thinking how to do a z in cursive, then follow this: a horizontal top line, diagonal middle line, and horizontal bottom line with or without flourishes.
Modern forms minimize the number of strokes and decoration without compromising the recognition of the letters in order to become faster and more readable.
Common formation challenges
- Too fancy flourishes which prevent reading.
- The mix-up of order of strokes resulting in awkward shapes.
- Problem with proportion, in comparison to lower case letters.
With the help of this letter formation guide and paying attention to the type of strokes and their consistency, your cursive writing will look smooth and elegant, and expressive.
Letter-Specific Tutorials
There are also extra troublesome letters that can be difficult because of their peculiar forms or lines, however, through the practice, they can be significantly easier. This section has specific tutorials on certain letters that are considered to be complex in order to master the formation and connection of these letters with confidence.
Challenging Lowercase Letters
It has some lowercase cursive letters that are notable due to their unique loops, strokes, or transitions.
- Cursive 'f': Cursive f is composed of high loop and cross stroke. Begin with a thin upward curve above the mid line and then bend downwards to a smooth loop beneath the baseline and crosses over the mid point.
- Cursive 'z': The cursive z is also a difficult one owing to the zigzag nature. Begin with a small horizontal line at the bottom and then curve upwards, round sharply downwards and finally smooth out at the end of the line to the point that leads to the next letter.
- Cursive 'r': The cursive r consists of an upward stroke that is simple and small top curve. The movement is to be light and fluid without raising the pen and creates an unbroken graceful arch into the succeeding letter.
- Cursive 's': This is a softer letter, with a final flick: initially the letter starts with a tiny loop at the bottom of the line, into a smooth curve and then a tail, which connects to the succeeding letter.
Difficult Capital Letters
Capital cursive writing is frequently used with ornate flourishes and complicated strokes, and requires additional practice. Here is how to go about some of the more difficult capitals.
- Capital 'S' in cursive: Wondering how to do a capital s in cursive, then keep in mind that the cursive S has flowing balanced curves. Begin a stroke with the top, and create the upper loop which then descends in a bigger loop sloping into a straight stroke.
- Capital 'F' in cursive: This is a tall main stroke with horizontal crossbars, a solid vertical line with decorative top loop and two clean cross strokes, one of them close to the top and one in the middle.
- Capital 'I' in cursive: The capital I may or may not have loops over it, or may be plain. A straight upright line would serve as the first practice followed by a minor loop of a top curve before the final base curve to join to the second letter.
- Capital 'Z' in cursive: The cursive Z is sharp-angled and smooth-linked. Make a leading line, slant down left, and then a horizontal bottom stroke is added, usually containing a loop or flourish.
Specific tutorials on these letters address complicated letter forms directly to give you a chance at becoming precision and style based and confident at every step of your cursive handwriting.
Connecting Letters and Word Formation
The quality of cursive writing is that it is made out of touching connections between letters giving the effect of a flowing word that is natural and effortless. Knowledge of how to join letters in the correct fashion is the main to the success of legibility and speed, as well as preserving the graceful rhythmic style of the cursive handwriting.
Basic Connection Principles
The writing of cursive must be based on the ability to master entry and exit strokes, on an ability to get the letters to fit together. It is important to keep a steady inclination and spacing of letters in order to make them readable and balanced. Rhythm can be created by practicing repetitively and this makes writing more fluid and graceful.
The most frequent issues, e.g., uneven connections or lapses, may be fixed with specific exercises stimulating fluid and connected movements of hands so that your writing would smoothly flow between the letters and words between words.
Practice Progressions
It is the time to start practicing connections with simple two-letter combinations in order to have control over linking strokes. There, proceed to the common word patterns and regularly used phrases that facilitate the process of transition. Progressively move to full sentence writing with steady flow and then paragraph level writing which develops skill as well as writing stamina.
With the emphasis on the methods of connection and the sequential approach to practicing, you will be able to make individual letters beautiful and connected handwriting.
Digital Cursive Applications
Cursive goes beyond paper to digital space in 2026, driving design work, apps and web-based solutions that mash up traditional refinement and hi-tech technologies. These programs render the practice, creation, and integration of cursive to be an easy task, both when engaging in creative tasks and also building skills.?
Cursive in Photoshop and Design Software
Wondering about how to do cursive in photoshop, then worry not as photoshop and other designing software provide strong facilities to make and personalize cursive writing. You can apply digital brush strokes that emulate the lines and touch of a real pen or you can put cursive fonts on logos, invitations, and other social media graphics. Also, the tablet with a stylus can be used to input natural cursive writing, which combines the experience of the traditional handwriting with the digital precision and flexibility.
Online Cursive Tools and Generators
Common free generators such as Calligraphr or TextStudio can be used to type text and automatically transform it into cursive forms and you can even preview multiple fonts. Select fonts depending on intent; such as pretty fonts such as Great Vibes to use on invitations or bold fonts to use on headings. Customization can be done in terms of size, color, kerning and effects but with restriction in free versions such as watermarks or limitation of exports.
Tip: To achieve best digital cursive, one should combine generators with Photoshop and make sure that the contrast is high, scalability must be tested, and that clarity would be ensured across the devices before using it.
Practice Systems and Improvement Plans
The regularity of progress in cursive writing can only be achieved through a programmed practice schedule. Having a solid road map will see you build up the basic skills in a systematic manner as you also build up speed, fluency, and style. The following is a narrowed down plan on improving your cursive handwriting within a 30-day period.
30-Day Cursive Improvement Plan
30-Day Cursive Improvement Plan for Faster, Neater Handwriting (2026) | Week | Focus Area | Activities | Goals |
| Week 1 | Foundation Building | Dedicate 15 minutes daily to practicing basic strokes and mastering single letter formation | Create muscle memory; ensure correct posture and grip |
| Week 2 | Connection Development | Practice two-letter combinations and common word patterns | Build rhythm and consistency; transition to smoother writing |
| Week 3 | Speed and Fluency | Timed writing exercises with sentences and paragraphs | Improve writing speed without losing legibility; develop unique style |
| Week 4 | Mastery and Refinement | Work on advanced flourishes, stylistic variations; real-world writing tasks like notes or invitations | Enhance style; establish maintenance routine |
Troubleshooting Common Problems
There are some general problems that you can face as you begin the journey of learning how to write in cursive hand clarity. To deal with them, the following are some of the strategies:
- Inconsistent Slant Correction Techniques: Make sure you sit in positions of comfort and position of hands. Train yourself to watch angles of letters, and to have a uniform slant, use lined paper, or guides.
- Size and Spacing Issues Solutions: Visualize the consistent letter spacing and size with the help of the graph paper. Store letters of the same height, and leave the same amount of space between letters and words.
- Legibility Improvement Strategies: You can reduce the rate at which you write, in order to focus on clarity. When you are learning to write, put complicated combinations of letters into easier parts so that your brain can take them in clearly.
- Speed vs. Quality Balance: It is important to balance between the speed and quality of writing. Exercises regularly, but with some time, can increase speed, although the emphasis should be on readability. When your handwriting becomes difficult to read then turn your attention on quality and then resume faster.
This step by step plan will see you on your way to being able to write confidently and gracefully in cursive handwriting in the long term.
Cursive Writing Tools and Materials
The choice of the appropriate tools helps to make the process of cursive writing enjoyable instead of a routine task, making the strokes smooth and results consistent. Traditional pens, specialized papers, all these suggestions can help novices and professionals improve their hands.
Traditional Writing Instruments
- Fountain Pens: Select easy to use models such as Lamy Safari or Pilot Metropolitan that have smooth writing with fine or medium nibs that can be used to flow in a cursive hand. These pens will deliver ink continuously without any interruptions; thus, they are ideal during the long sessions.?
- Gel and Rollerball Pens: Gel pens like the Parker Jotter will give skip-free lines at the least amount of pressure, and rollerballs like the Parker IM will provide the smoothness of the fountain pen with the reliability of the ballpoint when it comes to everyday cursive handwriting.?
- Pencil Options: To start exercises with strokes of the initial letter, soft-lead pencils (HB or 2B) can be used because it is easy to erase and shade to form the letter shape before changing to ink.?
- Nib and Tip Selection: Fine to medium nibs should be used in cursive, but more flexible options such as the Pilot Falcon can introduce some line variation to more experienced users, but should be avoided initially to concentrate on uniformity.
Practice Papers and Guides
- Lined paper specifications for cursive: Use paper that has a ruling of 1/4-inches and centerlines to ensure uniform height and incline.
- Printable guide sheets and templates: Free cursive worksheets with grayed letter guides and word families to copy and trace, with fading lines as the skill level improves.
- Digital tablet options and apps: Digital practice Digital goods such as GoodNotes or Procreate on iPads with an Apple Pencil mimic the experience of a pen on paper, with unlimited undo and replay of strokes.
- DIY practice materials: Prepare your own sheets with graph paper or with some laminated guides to have a dry-eraser session to reuse.
Being armed with these tools would guarantee effective and enjoyable development of cursive.
Age-Specific Learning Approaches
An effective way of teaching cursive writing involves differentiating the way the student is taught according to age and experience. The needs and challenges of children and adults are not similar and, therefore, it is necessary to take age-specific approaches to achieve better outcomes and make the process of learning more entertaining.
Teaching Children Cursive
- It is better to use amusing activities such as tracing letters and making letters out of shapes to make the practice enjoyable.
- Practice should be interesting using rewards and songs and themed worksheets with animals or stories.
- Managing challenges: e.g. shaky strokes or reversals can be overcome with short sessions and hand-strengthening, e.g. playdough.
- Offer Parent/teacher materials such as free printable guides and trackers of progress to help home-school.
Adult Cursive Learning
- Stop break patterns by doing 10-minute stroke exercises on a daily basis on muscle memory retraining.
- Use effective methods such as practice through the app and review on weekends when one has a tight schedule.
- Focus on professional applications (refined signatures and client notes) to increase motivation.
- Monitor the progress through before-after samples and journals to applaud gains and carry on with the momentum.
These age-matched methods have the greatest success and pleasure in the cultivation of graceful cursive handwriting.
Advanced Cursive Techniques
The higher forms of cursive involve the perfecting of the hand-writing, as a way of individuality and art rather than the simple practice of hand-making letters. Here the trend of developing a personal style is examined and ornamental cursive is presented into the tradition of calligraphy.
Developing Personal Style
The use of cursive and flourishes and embellishments makes writing elegant and characterized. The signature development is the development of unique, but readable designs which have their impact on personality and professionalism. Modifying the traditional forms of the cursive lets the writers have a balance between consistency and freedom over the creation of their handwriting, their handwriting will be the same but with a unique style of their own.
Calligraphy and Ornamental Cursive
The best way to enhance your cursive writing is by learning about calligraphy and decorative styles and by beginning with pointed pen which will transform common cursive to art. Study the basic styles used such as Spencerian and Copperplate, both of which are the predecessors of the modern cursive. Most modern adaptations are based on the mix of creativity and traditional sophistication, leading to individual expression based on the past.
To reduce the difficulty of learning the cursive hand, invest in the appropriate equipment such as good quality pointed pens, specialty inks and smooth paper. Experiment with various methods and medium using which your artistic vision can be most easily expressed.
Quick Reference Guides
Quick reference guides are handy sheets that can be used quickly in reviewing when practicing a session. Put these charts and lists close to each other to help in strengthening letter forms, connections and common words with ease.
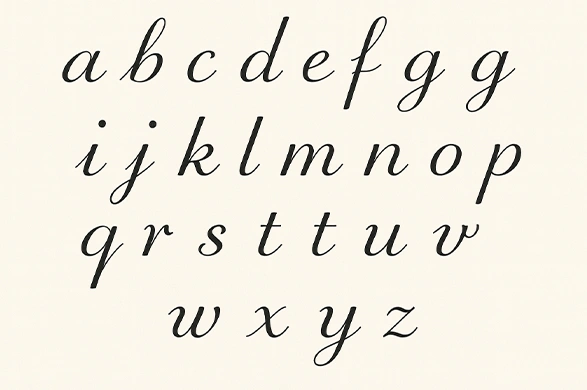
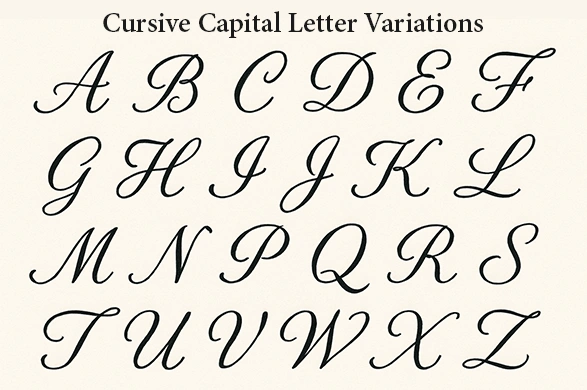
Complete Cursive Alphabet Charts
Lowercase Alphabet
Below is the chart depicting the lowercase alphabet in cursive writing:
Uppercase Alphabet
The chart below shows how the uppercase alphabets are written in cursive writing:
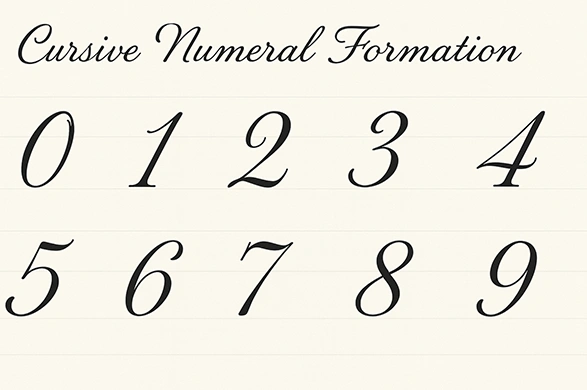
Number Formation
In cursive writing numbers are written in the way mentioned below in the diagram:
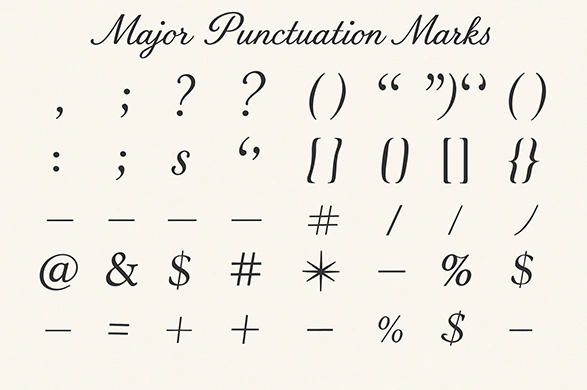
Punctuation Marks
The chart below shows how punctuation marks are drawn in cursive writing:
Common Word Practice Lists
Days of the week and months:
Cursive can be practiced on the common words to be sure. The following are some days and months to be written with cursive:
- Days of the Week: Monday, Tuesday, Wednesday, Thursday, Friday, Saturday, Sunday
- Months: January, February, March, April, May, June, July, August, September, October, November, December
Frequently used English words:
To improve the everyday writing, practice these frequently used English words in cursive:
the, and, for, are, but, not, you, all, can, had, her, was, one, our, out, day, get
Personal information practice
Writing personal information in cursive is usually handy. Here’s what to practice:
- Name: [Your Name]
- Address: [Your Address]
Business and professional terms
There are common terms that are used in a business setting. Write the following professional words in cursive in order to improve your writing style:
- Client
- Project
- Meeting
- Contract
- Invoice
- Feedback
With such quick reference guides you are able to practice and perfect your cursive handwriting in systematic way.
Practice Worksheets and Resources
Cursive skills are reinforced by practice worksheets and resources, which offer a structured guidance by means of repetitions and variety. The presence of downloadable printables and interactive online tools will provide equal access and efficiency of consistent practice to every learner.
Printable Practice Sheets
Letter formation guide
Digital Practice Options
- Tablet and stylus practice applications such as GoodNotes and Procreate are pressure-sensitive simulated handwriting.
- Instructional applications like MyCursive worksheet generator and iTrace provide lessons and tracing online in cursive handwriting.?
- Reddit's r/Handwriting or Cursive Writing Facebook groups offer community and forum feedback and shared sheets.
The presence of printable and online materials would guarantee a flexible approach and suitability to different learning styles and settings.
Conclusion
Learning cursive handing in 2026 will be a valuable experience in life, as it brings about creativity, expression of self, and fine motor control. Be it a beginner or wanting to perfect whatever you already have, this is a full guidebook that provides the gadgets, approaches, and rehearsal plans that can enable you to boost your cursive handwriting.
Learn to play the art of cursive because you want to use it as a means of communicating something that is deeper, closer to history, and more beautiful in the way that you write. By practice, you will realize that the cursive writing is not only better than the handwriting; but also provides a pleasant way to express yourself as an artist. And now take your pen and set on cursive way!