The demonstrative speech involves nothing more than how to do something by demonstrating to your audience. Just imagine a live tutorial and you teach them a process step by step, how to put together a piece of furniture, or how to make a nice cake, this is when the process speech examples are helpful. This aims at simplifying a complex process that is easy to interpret. To come up with a demonstrative speech, you will have to dismantle your selection of a process into some manageable examples. It is advisable that you consider what your audience already knows and base your explanation on it. Visual aids collectively become vital, and they will aid in outlining every step of your presentation. The smooth delivery is achieved by practice, so your movement as well as your explanation is practiced simultaneously. These are elements that you will be in control of once you grasp them, and as such, get to inform, entertain, and make your audience believe that they could easily duplicate this process without much hassle.
What Is a Process Speech?
A process speech, which is also called a demonstrative or how-to speech, is an informative presentation, as its name suggests, that explains how something works or how to do a certain task. The ultimate goal is to simplify a process by making it comprehensible with regard to its linear steps that are easy to grasp and may be replicated by the viewers. In this type of speech, the speaker usually uses some form of demonstration, which involves showing every step of the process by using visual aids or demonstrating the action during the speech. Effective examples of process speeches are those that put across complex details in a simplified manner that is understandable and usable to the listeners. The main objective is to give the listeners the facts and confidence to be able to revise the task on their own.
Key Features of a Process Speech
An effective process speech has a number of basic elements that guarantee clarity, comprehension, and recollection by the audience. All these characteristics are combined to turn a tricky process into a comprehensible and memorable performance.
Clear Step-by-Step Instructions
The art of successful process speech involves a detailed division of the procedure into manageable, logical steps, which can be explore with “how to write an informative speech” guide. It has to have clear steps,which are simple to read and in sequential order. Each step is like a mini lesson; it depends on the preceding lessons and moves on until the whole process is completed. In order to accomplish this, take into consideration the following:
- Plan out Each Step: It is always advisable to plan out everything even before writing. Weaken the strong points or trigger points, the points where one action stops and the other one starts, the points where results are achieved.
- Be Action Oriented: Employ a strong verb at the beginning of every step that makes it understandable to the audience what is supposed to be done.
- Give Brief Descriptions: Give a description of each step as much as is enough so that they can understand, but at the same time, not to overwhelm them. Eliminate superfluous excursions or data that are of no importance in the actual carrying out of the step.
- Count Your Steps: This is done by giving the steps a sequence, which can be made numerically, and guides the audience through the process.
- Prepare to Answer: There will be doubts or difficulties at all stages that your audience will be going through, and it is good to anticipate them and answer them in advance when you give your explanation.
Use of Visual Aids or Props
Since the process of demonstrating is a visual and prop backbone, it cannot be achieved without them. It could be a chart of a complicated process with the contents of a recipe, or parts that need to be put together. However, you must know that pictures make the information easier to understand and anchor it in the minds of your audience. They enable you to demonstrate, not simply to explain, which makes the course that much more active and engaging.

Audience Engagement
Maintaining interest in your audience is what will make your process or informative speech successful. This does not just mean putting across information, but engaging your audience with an Attention Getter. It is possible to do that by using a range of methods, including rhetorical questions, soliciting contributions, or employing a familiar process speech examples. A close audience is better to keep them following the process, explain the steps, and recall the process that you have shown.
Process Speech Examples
These are some of the examples of process speeches outlines on how varied things can be divided into steps with clear actions, and how a speech can be formed with a well-explained outline. Both examples point out this general ideology that is common in all about leading an audience through a process.
Example 1: How to Make a Paper Airplane
This is an appropriate topic to illustrate the principles of a process speech. It allows for clear, visual step-by-step instructions, emphasizing precision. A well-structured outline will aim to come up with a speech that empowers the audience to create a functional paper airplane that flies, demonstrating the power of following a well-defined process.
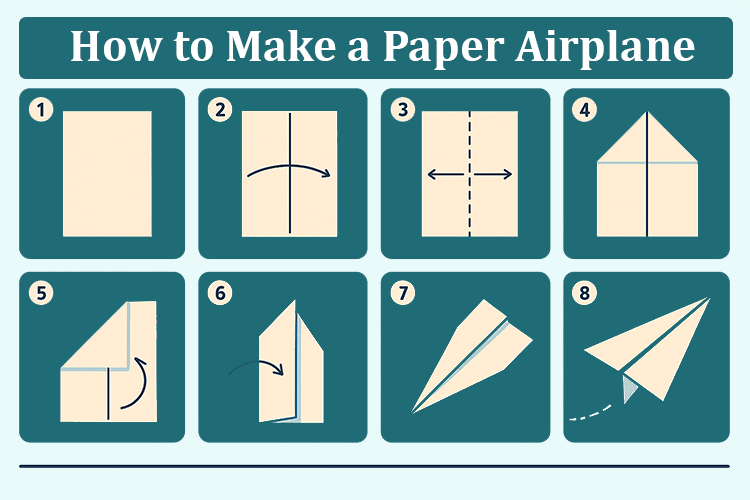
Process Speech Outline: How to Make a Paper Airplane | Process Speech Outline: How to Make a Paper Airplane I. Introduction A: Attention Getter: Remember the memories when you and your first paper airplane sailed through the air? Now, today, I am going to demonstrate how you can make a paper airplane to regain that bliss of childhood and enjoy it. B. Significance of the Topic: Folding a paper airplane could be not only an entertaining exercise but also a terrific method to learn about primary concepts in aerodynamics. C. Agenda: "We will discuss the materials required, how to fold step-by-step, and how to fly distance tips." II. Materials Needed A. Paper: "You could use anything, as long as it is a normal sheet of paper, but the printer paper or origami paper is the best suited to fold easily." B. Optional Equipment: "A ruler to make accurate measurements and a pencil to make creasing guidelines, but they are not required." III. Step-by-step Instructions A. Step 1 - Preparing a paper 1. Use plain paper that is 8.5 x 11 inches in size. 2. Make the paper clean without folds. B. Step 2: Half-Folding the Paper 1. Lengthwise, please fold the paper to make a center crease. 2. Open it out to show the crease. C. Step 3- Creating the nose 1. Fold the paper in half, top to bottom, and the two corners facing each other into the center fold. 2. This forms a triangle at the top of your paper. D. Step 4: Making the Wings 1. To form the triangle, fold the paper in such a way that it touches the bottom edge of the paper. 2. Next, turn each side over the bottom again, and this forms the shape of the wings. E. Step 5: Finishing up the Airplane 1. Ensure that your folds are crispy by rubbing your fingers with the edges. 2. The wings have to be adjusted upwards to improve flight. IV. Tips for Maximizing Flight Distance A. Try out various wing sizes by varying the width of your folds. B. Well, you could maybe replace the weight with paper clips to get it to hold on the nose. C. Try to launch your airplane in various directions until you get a suitable flight course. V. Conclusion A. Recap Main Points: Today, we discussed the materials required, the step-by-step procedure for folding it, and also the suggestion for achieving better flight distance. B. Call to Action: OK, now you should go and collect your supplies and attempt to fashion your own paper plane. How far can it fly? C. Concluding remarks: Fly with your imagination and see what happens! You may even be a paper plane champion. |
Example 2: How to Perform CPR
A speech on CPR thoroughly describes every step of performing it, from being responsive to your surroundings, giving compressions to the chest, and rescue breathing in exact steps, with which you can act. The aim of examples of process speeches is to provide the viewer with the core information and self-confidence to ultimately save a life due to their ability to adhere to a well-postulated procedure.
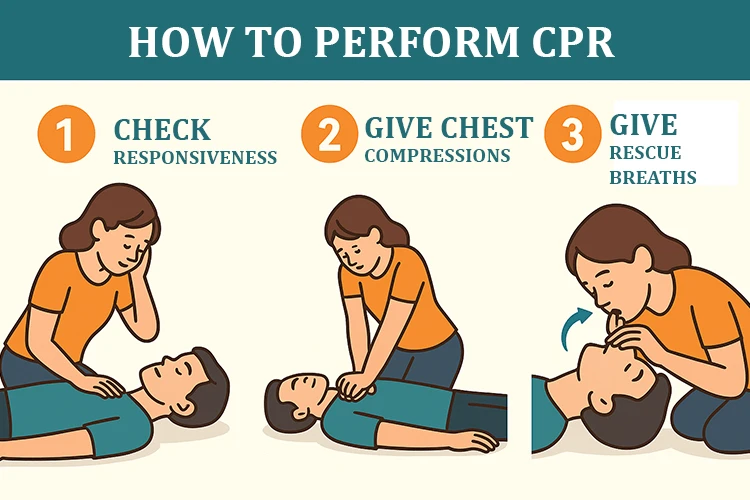
Outline for a Process Speech on "How to Perform CPR" | Outline for a Process Speech on "How to Perform CPR" I. Introduction A. Attention-grabbing opening 1. Start with a statistic about cardiac arrest 2. Brief story illustrating the importance of CPR B. Purpose of the speech 1. Educate the audience on how to perform CPR 2. Empower individuals to act during emergencies C. Overview of speech structure II. Understanding CPR A. Definition of CPR B. Importance of CPR in saving lives 1. Statistics on survival rates with and without CPR 2. Overview of situations requiring CPR III. Steps to Perform CPR A. Assessing the situation 1. Ensuring the scene is safe 2. Checking for responsiveness B. Calling for help 1. Importance of calling emergency services 2. How to instruct bystanders for assistance C. Checking for breathing 1. Looking, listening, and feeling for breathing 2. Knowing when to start CPR D. Performing chest compressions 1. Proper hand placement 2. Compression depth and rate 3. Importance of allowing complete chest recoil E. Delivering rescue breaths 1. The importance of rescue breaths 2. Technique for giving breaths F. Using an Automated External Defibrillator 1. Importance of an AED in CPR 2. How to use an AED step-by-step IV. Special Considerations A. Variations for different age groups B. When to stop CPR 1. Signs of life 2. Arrival of emergency personnel 3. Exhaustion of the rescuer V. Conclusion A. Recap of key points B. Encouragement to get certified in CPR and first aid C. Call to action: Be prepared and willing to help in emergencies VI. Questions and Answers A. Open the floor for audience questions B. Provide clarifications or additional information as needed |
Example 3: How a 3D Printer Works
This topic is an excellent choice in terms of an informative speech about processes example with the explanation of a complicated technology. It covers the complex process of digital design to the real object and includes a guide for loading the filament, heating, layering, and cooling. In his speech, the orator will demystify the tech to the audience so that they comprehend the chain of processes that 3D printers undergo to be able to produce 3D objects.
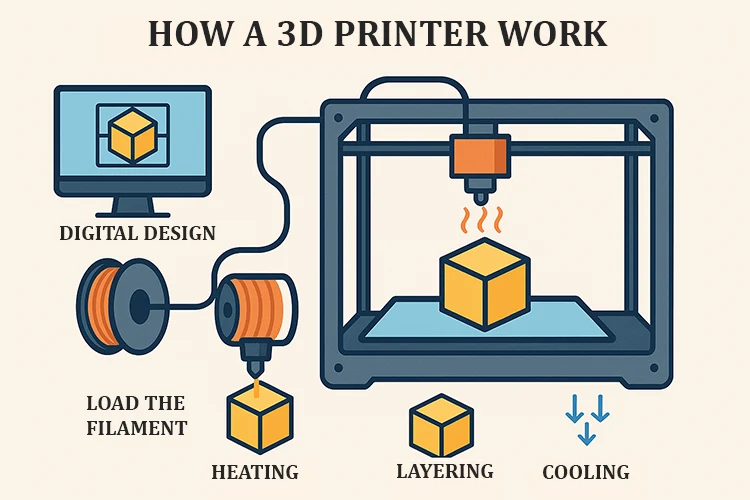
Outline for Process Speech: "How a 3D Printer Works" | Outline for Process Speech: "How a 3D Printer Works" I. Introduction A. Attention Grabber: Imagine creating a physical object from a digital design right at home. B. Importance of 3D printing in various industries (e.g., manufacturing, healthcare, education). C. Purpose of the speech: To explain the process of how a 3D printer works. II. Overview of 3D Printing Technology A. Definition of 3D printing B. Brief history of 3D printing development C. Types of 3D printers III. The 3D Printing Process A. Step 1: Designing the 3D Model 1. Using CAD software to create a digital design 2. Importance of file formats B. Step 2: Slicing the Model 1. Explanation of slicing software 2. How the model is divided into layers for printing C. Step 3: Setting Up the Printer 1. Preparing the printer 2. Loading filament or resin D. Step 4: Printing the Object 1. How the printer creates the object layer by layer 2. Different techniques used in various printer types E. Step 5: Post-Processing 1. Removing supports and cleanup 2. Additional finishing techniques IV. Applications of 3D Printing A. Industries utilizing 3D printing B. Examples of innovative products created through 3D printing V. Challenges and Future of 3D Printing A. Current limitations and challenges in 3D printing technology B. Potential future advancements and their implications VI. Conclusion A. Recap of the 3D printing process and its significance B. Encouragement to explore 3D printing technology further C. Closing thought: The possibilities of bringing digital ideas to life are limitless. |
Example 4: How to Brew Coffee
The topic is ideal to use in making a practical, relatable process speech in which one takes the listeners through a familiar, mundane routine. It consists of telling the order of actions such as choosing the beans, grinding, selecting a brewing system, calibration of components, and performance of pouring. The examples of speeches about processes are about making the ordinary task of making coffee a mindful experience, with which the audience will feel able to consistently produce a good-tasting cup of coffee at home.

Outline for Process Speech: "How to Brew Coffee" | Outline for Process Speech: "How to Brew Coffee" I. Introduction A. Attention Grabber: Just imagine the smell of newly brewed coffee filling your kitchen each morning. B. The significance of coffee in everyday life and its values in the world. C. Rationale of the speech: Not to do a speech on coffee, but rather an explanation of how coffee is brewed to perfection. II. General Information on Coffee A. The history of drinking coffee in brief B. Various categories of coffee beans C. General ways of brewing III. The process significantly influences the taste and quality of the coffee. A. Step 1: The Process of Choosing the Coffee Beans 1. Whole bean coffee or pre-ground coffee? 2. The significance of freshness and equipment storage. The necessity of freshness and adequate storage must be considered as the backbone of equipment. B. Step 2: Grinding of the Coffee 1. Varied grind for individual techniques of brewing. Different grinds to different brewing variances. 2. Grinding implements C. Step 3: Coffee and Water Localization 1. Ratio of coffee and water recommended 2. Measurement instruments D. Step 4: Brew the Coffee 1. Procedures of various practices 2. Procedures of common procedures E. Step 5: Drinking goods and coffee. 1. Advice on transforming into a correct serving 2. With the improvement of flavor by the addition of milk, sugar, or flavorings IV. Mistakes and Hints to Perfect Coffee A. Mistakes that we make most often B. Flavor suggestions and consistency suggestions V. Conclusion A. Reiteration of the coffee brew process and how it affects flavor B. Incentives to test other flavors and brewing techniques C. Final message: That perfect coffee is able to make your day and make your senses alive. IV. Common Mistakes and Tips for Perfect Coffee A. Common pitfalls B. Tips for improving flavor and consistency V. Conclusion A. Recap of the coffee brewing process and its impact on flavor B. Encouragement to experiment with different brewing methods and flavors C. Closing thought: The perfect cup of coffee can elevate your day and awaken your senses. |
Sample Process Speech Outline
In order to organize your process speech well, it is necessary to have a clear outline. It provides a rational flow and takes into account all the related steps to ensure that you are able to manage time while delivering the speech, and nothing is missed. The following is a process speech outline example, which could be modified as per your topic:
Outline Structure
Before you start constructing your process speech, it is essential to know that a well-organized outline of the speech usually contains three main parts: introduction, body, and conclusion.
- The introduction starts with a hook to interest the audience and then contains a direct thesis statement with an explanation of what process should be shown. The primary steps are outlined in a scanty preview that preconditions the audience.
- The body is the central part of the speech. It further consists of three to five specific phases of the process. In any step, there must be instructions, demonstrations, and explanations of the step-by-step guide.
- When it comes to the conclusion, it restates the most decisive actions, summarizes the main message or advantage of the speech, and makes a concluding statement or charge. This format makes it capable of being easily understood and remembered.
Example Outline: How to Tie a Tie
Topics like “How to Tie a Tie” itself explains that it requires a step-by-step guide, suggesting that you must form a process speech outline example to come up with an impressive and effective process speech.
Example Outline: How to Tie a Tie | Outline | Speech |
| I. Introduction A. Description of the significance of tying a tie in a few words C. Rationale of the speech: to learn the art of simply tying a knot II. Materials Needed A. A tie B. A choker shirt III. Instructions on How to Tie a Tie A. Preparation 1. Wrap the tie around your neck so that the broad end is on the side of your choice 2. Make sure that the narrow end is hanging just a little bit shorter than the wide end B. Without a Strand, Which Makes the Knot 1. Put the broad end across the small end 2. Bend the hose with the large end so that it goes under the small end C. Developing the Front of the Knot 1. Bend the wide end down, and to the left 3. Drag it in through the front loop D. Tying of the Tie 1. Grip the thin end and pull the knot of the tie up to your collar 2. Make sure that the tie is centered and the lengths are equal IV. Final Touches A. Adjust the tie in place, where it is needed B. Look at putting the narrow tip up into the keeper loop when the latter is present V. Conclusion A. Summarize the points B. Highlight how to tie a tie on different occasions C. Practice skill enhancement | How to Tie a Tie Ladies and Gentlemen, Ladish and Gentlemen Today, what I would like to speak about is one of the useful skills which sometimes can be treated as quite an elegant one: namely, tying a tie. Whether you need to wear a tie for a job interview, a wedding, or other formal event, it goes without saying that the style of tie can give your appearance the needed polish. I want to make this easy for you, so on top of this talk, you will be able to have a gorgeous, confident knot. To begin with, all you require are two things: A. A tie, well, there is something of a favorite one, and one that will suit you. B. A choker shirt, that is, a shirt with a collar, will be resting on this part. It is time now to explore how to tie a tie step by step. 1. To begin with, put the tie around the neck. And be sure that that which is broad just as thou dost like, which is commonly on the right, and hang your narrow end on the left. 2. Make the long ones shorter than the short ends so that the narrow end is slightly shorter than the wide end. And a Strand which kinch away, Which makes the Knot 1. In order now to take the broad end across the narrow. 2. Form it by bending the broad end back upon the narrow end. This will constitute a knot that we are making. The Creation of the Front of the Knot 1. Then you are going to bend the thick end over and towards the left. 2. Drag the wide end between the loop that has just been formed in the first part of the knot. Now this will begin to get you the form of the knot. At last, here is the tying up of the Tie 1. The vital thing now is to hold the small end of the tie between your thumb and fingers of one hand, and with the other hand, to draw the knot up against your collar. 2. Make sure that the tie is positioned in the middle and that both sides of the tie are equal in length. This is relevant when one wants a smooth appearance. After getting the desired position, align the tie so that it lies snugly on your collar. Another tip to remember is to feed the narrow end into the keeper loop in your tie. We have, therefore, reviewed the points of tying a tie: preparation and last add-ons. This is why the skills you learned can come in handy in many scenarios, e.g., business occasions, formal events, or simply when you want your very best outfit. The greater your practice, the more skilled you will get. It is time to get a tie and learn how to use it! Thank you, and I hope this helps you feel more confident when you have to wear a tie the next time. Thank you! |
Choosing Topics for Process Speeches
Process or Demonstrative speech requires you to pick process speech topic examples that tend to give instructions or a guide on how to do something. The speech helps to learn the process so the audience can decide and do it on their own later. Let's delve into the topics you can consider for the process speech:
Selecting Engaging Topics
As you select a topic for your process speech, make it of practical value and something that the audience will be able to connect with. An example would be when addressing students, the title to a complex scientific process would never hold its audience, unless in the context of, How to Budget for College. Also, see whether you are able to show or describe the process within your allowed time, which is normally 5-7 minutes. Is it feasible to address all the steps in an understandable manner without being rushed, because it may be too complex to provide a brief speech? It is so that the audience is able to proceed with the confidence that they might attempt the process later.
Topic Ideas
The process of speech ideas or topics could be anything from complex to a daily routine. The main focus must be on how well you can present the topic, with steps and details. Some topic ideas you can consider are discussed below:
- How to Meditate for Beginners
- How to Code a Simple App
- How to Plant a Small Herb Garden
- How to Change a Bike Chain
- How to Brew the Perfect Cup of Coffee
- How to Tie a Specific Knot
Tips for Delivering a Process Speech
A process speech can only be done well by communicating effectively and, more often, through visual means. You aim to lead your audience through each step, enabling them to comprehend the process and replicate it. These are some of the main suggestions so that your process speech becomes successful:
- Practicing your words is not going to be enough; you have to physically walk through your entire procedure several times.
- Break down every action and explain it in simple and straightforward words. Pretend that you are teaching it to someone who has no idea about it.
- You should not hurry when instructing others, as it will make you lose your audience. Feed the information to your audience slowly.
- Make it easy by giving your audience time to internalize what you are saying, by giving them time to process one step at a time.
- Either state explicitly what step one, step two, etc., is, or use visual aids on slides to divide each step. This makes it easy to jog the memory of the audience into the order they need to follow.
- Not only tell them what they are supposed to do, but also briefly tell them the relevance of each step, or rather, the purpose of each step. This provides insight and makes the instructions stronger.
- When speaking with people, even when you are proving a point, look up every now and then and look at your listeners. This has them engaged and will enable you to determine their level of comprehension.
- Think of the things that are most likely to fail or setbacks that one may encounter in a process implementation, your way.
- It is also useful to make a brief handout that has an explanation or include a web link that can give a list of the steps.
- Summarise the key points and re-emphasise the overall advantage or outcome of having successfully gone through the process.
Common Mistakes to Avoid
When delivering a process speech, avoiding common pitfalls is as important as following best practices. Be mindful of these mistakes:
- A frequent error is speaking too quickly, especially when demonstrating. This overwhelms the audience and makes it impossible for them to follow along.
- Never assume your audience knows basic terms or steps. Using jargon without explanation is a quick way to lose them.
- Trying to explain a complex physical process purely through words is ineffective. Not having the right props or visuals, or having them too small to see, will hinder understanding.
- Presenting steps out of order or jumping back and forth creates confusion. A process needs a logical flow.
- While thoroughness is exemplary, cramming too many intricate details or too many steps into a short speech will feel rushed and unclear.
- Writing a process speech, especially one with a demonstration, often leads to fumbling, forgotten steps, or technical issues.
- Just listing steps can be monotonous. Not checking if the audience understands or maintaining eye contact makes the speech dry.
- If the audience doesn't understand the end result or why learning the process is beneficial, their motivation to follow along diminishes.
Resources for Crafting Process Speeches
Seek the help of different sources to perfect your process speech. Visually complex steps can be illustrated by online tutorials and how-to videos. Under public speaking, specific processes, books on how to do public speaking are readily available in your local library. Examples of speech about reading processes and TED Talks are great examples of how to give a clear exposition. As a reminder, do not leave out peer feedback to discover vague areas.
Conclusion
A process speech is also known as a presentation that provides an audience with a sequential procedure of doing something or telling how something works. The effective one can be developed by choosing topics, developing an accurate process speech outline example, and using visuals. Practicing, being clear, and avoiding some common mistakes, such as rushiness, make the delivery successful. The end product is eventually going to enable your audience to become more knowledgeable.