You have chosen the right path of learning cursive writing, but you know what? There are multifactorial benefits that most of the people completely overlook. And the moment you know it, cursive writing stops feeling like just another handwriting style.
Cursive trains your brain differently by lighting up both hemispheres of your brain more than typing ever could. Moreover, it leads to smoother thinking, sharper memory, and better focus- basically a tiny workout every time your pen moves.
No doubt it sounds good, but now the question is how to get from the idea to reality. Fortunately, this guide answers this by breaking down how to handwrite in cursive letters into a few straightforward steps anyone willing to do it can follow, irrespective of whether they are a student or an inexperienced adult.
And there's one more thing: a bonus waiting near the end that takes your cursive learning to the next level. Not spoiling it here. So keep scrolling, because this is your simple, no-stress guide to writing cursive well, letter by letter.
What Is Cursive Writing?
Handwriting styles generally fall into two main categories: disconnected print manuscript and flowing script. Students are usually stuck with a question like What is cursive writing and where it lies between these two categories. So the answer is it belongs to the flowing script. At its core, it is simply a style of handwriting where letters link together in a single, continuous line across the paper.
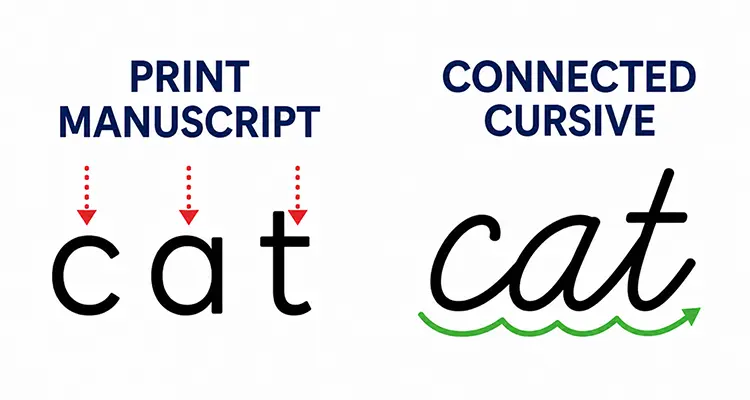
Standard manuscript print makes your hand stop and lift the pen/pencil. And that also works as a reset on the page for every character and word. Whereas connected writing removes those constant stops, allowing your hand to smoothly flow from start to finish.
When you spend time writing in cursive, your brain perceives clusters of letters as complete words instead of disconnected pieces. And this cognitive level shift answers why students who master cursive writing script see jumps in their academic journey in the form of reading fluency and spelling confidence.
Moving a pen in rhythmic loops serves as a bridge between physical movement and thoughts. As a result, ideas flow on paper much faster when you do not lift your hand every few seconds.
A Brief History: Who Invented Cursive Writing?
Finding a way to speed up handwriting has been part of human history for thousands of years, and it is not wrong to say that this search has a rooted connection to this writing style.
Curious learners always find themselves in a situation where they are stuck with a question like: who invented cursive writing? And when they are expecting a single creator, the truth is different: no single person came up with it. This script grew naturally across different cultures as writing tools and paper changed. So, it would not be wrong to say that looking for speed and efficiency has driven handwriting improvements throughout human history. So, let's roll out the history pages and see where it all started and how it now reflects in the modern age.
Phase 1: Ancient Egypt: In this era, Egyptians created early forms of connected writing, known as Hieratic script, on papyrus (an early paper-like writing material) to record administrative and legal documents. It saves time when compared to drawing detailed pictorial hieroglyphs.
Phase 2: 15th Century Renaissance: Students who are exploring history are usually hit by the quest for Cursive writing history. And as per record, it is safe to say that credit belongs largely to Niccolò Niccoli, a dedicated Italian scholar of the 15th century. He needed a swift, legible script for copying classical literature before Gutenberg's printing press came into the bigger picture. He created a slanted, flowing hand that was fast to write and easy to read.
Phase 3: 19th Century America: Thanks to Platt Rogers Spencer, who brought something revolutionary to cursive writing in the form of Spencerian cursive. American education adopted structured handwriting systems through his work. Austin Norman Palmer is another name in this development race of cursive writing. He introduced the Palmer Method, which focuses on moving the proximal muscles of the arm rather than the hand to form letters and words. Classrooms across the United States taught these methods so students and clerks could handle business correspondence with neatness and speed.
Phase 4: Modern Era: Writing tools gradually shifted from quills and steel nibs to ballpoint pens and digital styluses. Connected script maintained its place in education because it saves time while keeping personal handwriting readable.
Special Note: Linguists trace the word back to the Latin term "cursivus", which translates to "running." That origin describes the action perfectly: your pen literally runs across the page without stopping.
Why You Should Learn Cursive Writing?
Replacing stiff print strokes with continuous movement gives students a noticeable advantage in daily schoolwork. Traditional block printing requires constant stopping and starting, which tires out hand muscles quickly.
Joining letter strokes eliminates physical strain, allowing thoughts to move onto paper as fast as they form in the mind.
You need to understand the basics, as the cornerstones for fluid handwriting are Correct posture and paper placement, as it also helps in preventing the wrist tension that may be a barrier in speeding up the writing. But it has differences for both types of writers: right-handed and left-handed people.
Right-Handed Writers: Tilt the paper so that the top edge faces your left, as this will enable the forearms to naturally glide over the desk surface.
Left-Handed Writers: In the opposite direction, lean the paper towards the right, which will permit you to keep your wrist aligned and lower than the writing line. Because of this, you won't smudge the ink.
Key Benefits of Cursive Writing
- Stronger Fine Motor Control: Writing is a continuous stroke process that improves hand control, apart from increasing finger coordination.
- Increased Note-Taking Speed: Holding the pen tip on the paper increases the velocity of the writing process both during lectures, study periods, and timed exams.
- Access to Historical Documents: The ability to decipher these patterns allows students to explore original sources written in hand, and amongst them is, for instance, the United States Constitution.
Cognitive science studies show that handwriting is much more effective than typing for remembering information. The brain records and associates the special hand movement sequence linked to each letter and the way it has been written on the paper.
How to Learn Cursive Writing: Step by Step
Teachers and parents looking for how to learn cursive writing succeed best when following a clear progression. Trying to produce whole sentences on the first day will only be frustrating; Yet, when learning gradually with one skill at a time, you will feel more confident. So here are the steps that serve as stepping stones to reach mastery in cursive writing.
- Adjust Sitting Posture and Paper Slant: Maintain an upright posture and keep your feet flat on the ground. Position your paper so that there is a comfortable slant.
- Practice Basic Slant Strokes: Use a dynamic tri-pen grip and hold your writing instrument gently.
- Master Lowercase Letters First: Start with learning the alphabet in the smallest forms, then go for the big ones if you feel comfortable with all the basics of lowercase letters.
- Learn Uppercase Capital Letters: The second step is to get hold of the large letter forms - they are the characters that start new sentences and stand for names of people or places.
- Practice Letter Connections: When you write without lifting your pen, make sure that one letter connects straight into the start of the next letter.
- Write Short Daily Sentences: Cover all your penmanship techniques together by writing sentences in cursive every day. It boosts your confidence and improves the skill gradually.
Pro Tip: Make sure to keep your practice sessions light and relaxed, as it will turn penmanship into an enjoyable daily habit, and this skill development phase does not seem like a task to do.
Cursive Writing A to Z: Full Alphabet Guide
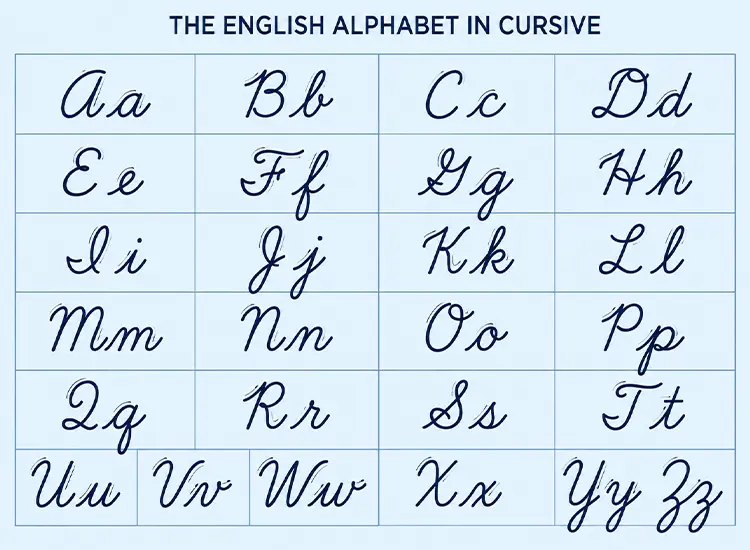
A visual reference guide simplifies mastering the cursive alphabet. The alphabet splits into two natural groups: lowercase letters that form word bodies and uppercase capitals that open sentences.
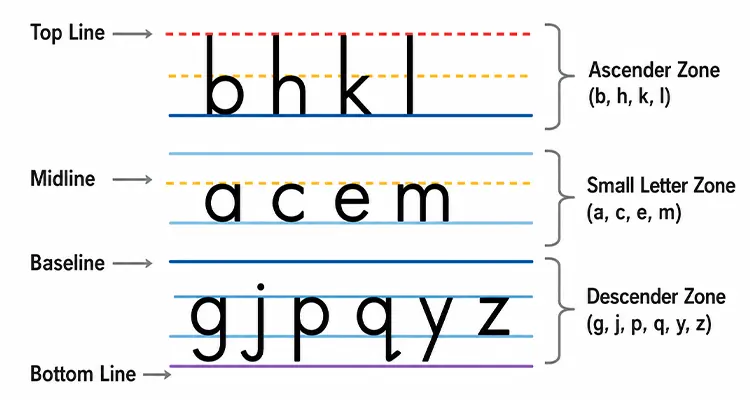
Standard practice paper uses three guidelines: a top line, a dashed midline, and a solid baseline. Keeping letter loops anchored within these spatial zones ensures your handwriting looks clean, balanced, and uniform.
Lowercase Cursive Alphabet (a–z)
Small cursive letters group into four distinct motor families based on the physical stroke your hand uses to start them. Learning letters by movement family works dramatically faster than practicing in plain alphabetical order.
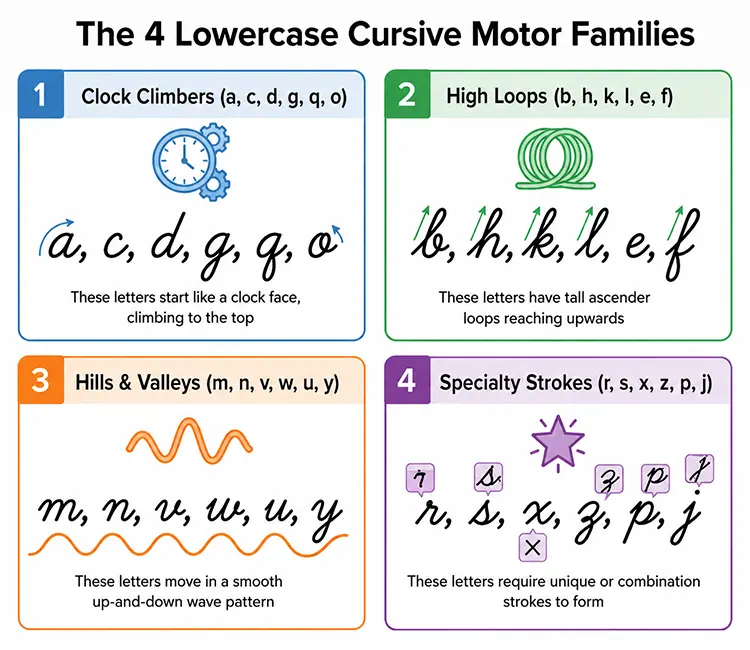
- The Clock Climbers (a, c, d, g, q, o): Bend forward to meet the body's midline, change direction in clock-hand style, and close the curve with a connecting line.
- The High Loops (b, h, k, l, e, f): Lift them to the upper line; make a loop to the left; drop back directly onto the lower line.
- The Hills and Valleys (m, n, v, w, u, y): As its name suggests, gently shaped hills and valleys, i. e., ascending curves and dipping arcs between the middle and the lower lines.
- The Specialty Strokes (r, s, x, z, p, j): Feature unique sharp points, descender loops, or diagonal cross-lines.
Succeeding at how to write cursive writing a to z requires paying special attention to tricky characters like lowercase r and z, which differ significantly from their printed versions.
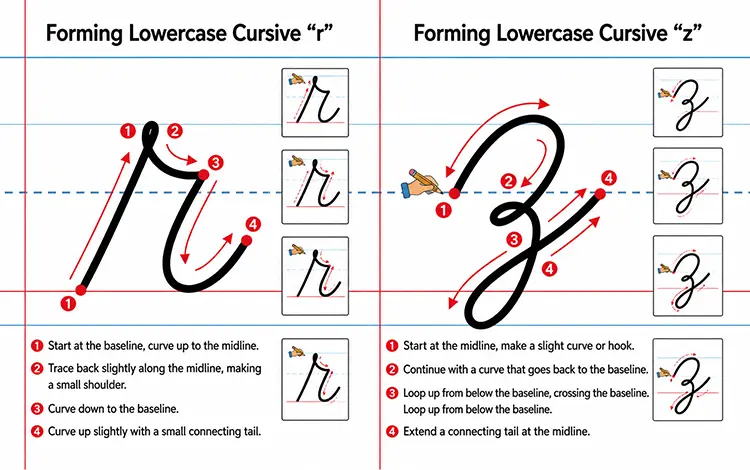
Let’s learn with an example:
1. When making a lowercase r, make sure to follow these three steps first: your pen climbs to the midline, second it steps horizontally to the right, and lastly it drops to the baseline.
2. For a lowercase z, start making a small initial mound, then swoop below the baseline to create a long descender loop, and here comes the z letter in cursive writing.
Uppercase Cursive Alphabet (A–Z)
Capital letters fill the complete vertical space between the baseline and top line. Most capital letters stand on their own without connecting, although letters like A, C, E, H, and M flow naturally into the following lowercase letter.
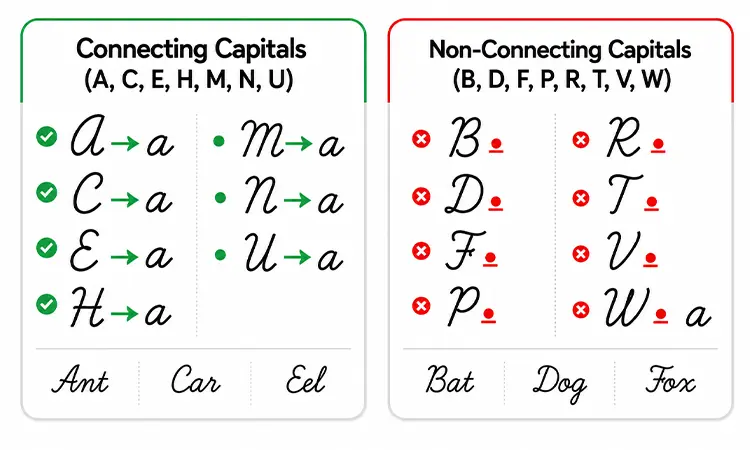
| Capital Family | Included Letters | Primary Physical Stroke | Connection Behavior |
| Oval & Loop Openers | A, C, E, G, O, Q | Counter-clockwise sweeping loop | A, C, E connect; G, O, Q stay separate |
| Stem & Flourish Tops | B, D, F, P, R, T | Vertical downstem with top banner stroke | Complete separate from following letter |
| Mountain Overcurves | H, K, M, N, U, V, W, Y | Sweeping entry mound from midline | H, K, M, N, U flow directly into next letter |
| Descender Swings | I, J, Z | Deep baseline loop or undercurve | J, Z connect naturally; I stays separate |
Engage your whole forearm when making capital flourishes instead of squeezing your fingers tightly. Moving from the elbow and shoulder keeps curves smooth and prevents hand fatigue.
Keep the italic angle consistent throughout capital and small letters. A uniform leaning character look on your page makes it a smooth, sophisticated, and professional presentation.
Cursive Writing Practice Tips & Worksheets
There is no rocket science, but only a simple calculation that says a structured daily routine plus gradually learning from mistakes is equal to a great level-up in skill. Using high-quality cursive writing practice sheets provides clear visual guidelines so you can track your improvement day by day.
| Practice Parameter | Recommended Approach | Educational Value |
| Session Length | 10 to 15 minutes daily | Prevents hand fatigue and builds motor memory |
| Paper Slant | Angle paper comfortably | Keeps wrist relaxed and prevents smudging |
| Writing Tool | Smooth pen, pencil, or stylus | Encourages light pressure and smooth gliding |
| Main Priority | Focus on neatness before speed | Ensures clean letter shapes before racing |
- Keep Your Practice Short: It's a good idea to practice motor memory every 15 or so minutes rather than dedicating the entire Saturday to practice, which is not ideal for both left-handed and right-handed writers.
- Angle Your Paper Properly: Right-handed writers should tilt the paper to a degree on the left side, whereas left-handed writers should tilt it towards the right so that they don't write over their hand.
- Concentrate on Rhythm at First: When your fingers get used to the movements of a letter, your writing tempo will automatically increase. Be sure that your handwriting has proper forms before making a dash to write quickly, as it will be of no benefit to you.
Arrange your worksheets for the practice session completed in a binder so that one may refer to them at the end, say after some three or four weeks. Your improvement over days and weeks is quite amazing to witness and it is a great motivator.
How to Teach Cursive Writing to Kids
There are multiple ways that educators can use to teach cursive writing to Kids so that they can achieve the best results. Before we directly jump into the writing, there are a few things to implement, which we segmented into four steps and which are listed below.
Implementation Steps for Educators:
- Ideal Age Window: Introduce connected script around second or third grade (ages 7 to 9). At this age, children possess solid print skills and the fine motor strength needed for continuous line control.
- Large-Muscle Skywriting: Ask your kids to stretch out their arm and draw big letter shapes in the air with their shoulder moving first before the pen touches the paper.
- Tactile Tracing: Students can be given tracing of letters in sand trays or shaving cream. Writing while chanting the stroke directions makes motor pathways lock into memory more deeply.
- Positive Reinforcement: Focus on and acknowledge effort and progress rather than technical aspects to perfection. The development of handwriting neatly takes a period of time, and each child learns at a different natural pace.
Common Mistakes Beginners Make in Cursive Writing
If the mistakes are recognized early, they can be avoided and not become permanent habits in handwriting. So, check out some of the most overlooked mistakes that students make while learning cursive writing.
- Gripping the Pen Too Tightly: If you hold your pen too tightly, it becomes so difficult that you might develop hand aches, and you will draw unsteady lines.
- Floating Above the Baseline: Beginners sometimes let words drift upward like balloons. Remind writers that every letter must touch the baseline.
- Mixing Slant Angles: Tilting some letters forward and others backward makes writing look messy. Keep your paper angled at one steady position.
Rushing through words often squishes letter loops together. Slowing down your hand speed keeps curves rounded and word spacing even.
Cursive Writing Tools & Generators
Digital reference tools offer great support when designing custom practice pages for home or school. Utilizing a free cursive generator lets you type in custom spelling words or sentences and print them out instantly as light tracing lines.
Exploring different aesthetic styles is easy when you select a clean cursive font on your computer. Printing out custom word lists gives children fresh, engaging pages to trace.
Combining digital tracing tools with paper practice creates a solid learning balance. Children can observe how a letter forms on screen, then practice drawing it on paper.
Deep Dive: The Science of Handwriting and Brain Growth
Looking at brain activity while writing is a reason why writing with fingers remains important. Brain scanning methods have shown that a different set of neuronal activities in brain circuits is related to keyboard typing and handwriting.
Writing by hand involves more neural activity than typing, which is a simple pressing of keys on the keyboard. In keyboard typing, each keystroke is a repeat of the same finger tapping motion, while writing each letter of the hand alphabet takes the use of a particular stroke and a complete motor program with which each letter can be written.
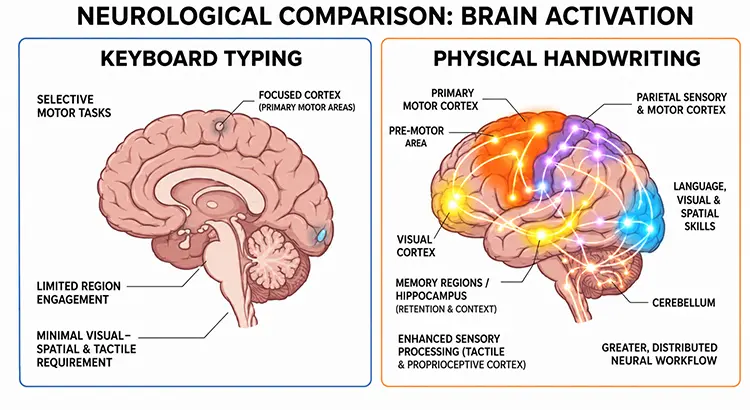
Key Cognitive Findings
- Reading Acceleration: Children who practice handwriting learn to read faster. Paying close attention to physical strokes helps the brain recognize printed words more easily.
- Support for Dyslexia & Dysgraphia: Continuous script supports children with learning differences. Writing in one fluid motion eliminates constant decisions about where to place the next letter, making writing feel far less exhausting.
- Orthographic Mapping: Linking letter shapes directly to hand movements strengthens letter-sound connections in the brain's reading network.
Special Bonus Practice Kit
Grab our free practice package to help you build smooth handwriting step by step:
Download Free Cursive Writing Practice Sheets (PDF): Includes stroke direction guides, baseline lines, and motor family practice worksheets.
Sources
Semeraro, C., Coppola, G., Cassibba, R., & Lucangeli, D. (2019). Teaching of cursive writing in the first year of primary school: Effect on reading and writing skills. PLoS ONE, 14(2), e0209978. https://doi.org/10.1371/journal.pone.0209978
Hersher, R. (2024, May 11). As schools reconsider cursive, research homes in on handwriting's brain benefits. NPR. https://www.npr.org/sections/health-shots/2024/05/11/1250529661/handwriting-cursive-typing-schools-learning-brain
National Education Association. (2022, February 4). The great cursive writing debate. NEA Today. https://www.nea.org/nea-today/all-news-articles/great-cursive-writing-debate
Education.com. (n.d.). Cursive worksheets [Educational resource collection]. https://www.education.com/resources/worksheets/english-language-arts/handwriting/cursive/